Click here to read this mailing online.
Here are the latest updates for nurhasaan10@gmail.com "Free Technology for Teachers" - 4 new articles
How to Create Your Own Educational Games With TinyTap - Getting Started TinyTap is a great platform that I’ve been sharing with teachers since 2012, a full decade this fall. In that time I’ve seen it evolve from an iPad app for creating simple games to a full suite of tools for creating educational games to play on iPads, on Android devices, and in the web browser on your favorite computer including Chromebooks. The latest update to TinyTap enables you to create educational games on your computer. Over the next few weeks I’ll be highlighting the many kinds of games you can create in the web browser version of TinyTap, how to make them, and some use cases for them. This week we’ll start with the basics of building and publishing your first game on TinyTap. Getting Started - Creating Your First TinyTap Game If you want to get a sense of how games are played before you create your first one, you can do so by simply going to TinyTap.com and trying one of the “editor’s choice” games. You can play any and all of those games in your web browser without creating an account, but you’ll get a better experience by creating a free TinyTap account. When you browse through and play some of the editor’s choice games you’ll see that the simplest kind of game is an object identification game. Creating that kind of game is a great way to learn the basics of game creation on TinyTap. To get started on the process of making a game you will need to sign-up for a free TinyTap account by clicking on the blue teacher icon, sign in, and then click the create button at the top of the screen. Once you do that you’ll see the game editor appear. Give your game a name (you can always change it later if needed) then you’re ready to add content to your game. The process of creating a TinyTap game is much like creating a slide in PowerPoint or Google Slides. You can start by choosing one of the many slide designs or use just a blank slide design. After choosing a design, add a picture to the game. You can upload pictures or use the integrated search tool to find pictures to use in your game. In the example below, I’ve included a picture of a baseball and a picture of an American football. Both pictures were found through the integrated image search tool. 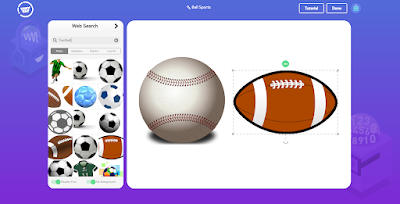 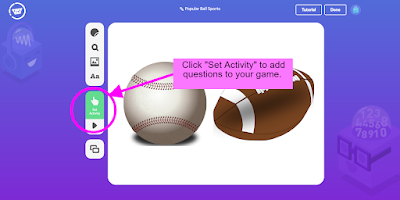 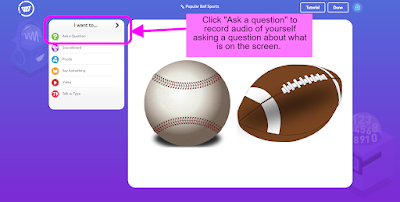 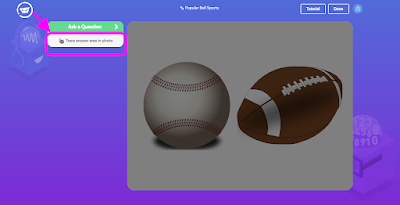 So far we’ve created just one question with two answer choices. You could create a slide that has more images and answer choices on it, TinyTap calls this a Soundboard activity. You can also create multiple slides to be published as part of the same game. That’s where TinyTap begins to shine. By adding more slides you begin to create a larger and better game experience for your students. Expanding Your First TinyTap Game As I alluded to above, there is a lot more that you can do with TinyTap’s game creator than just make a one-slide identification game. I’d recommend at the very least adding an engaging title slide and a “say something” activity. To add a title slide to my game I just clicked the new slide icon then selected a new style for it. The style selector gives you access to a wide selection of “creation packs” offered by TinyTap. In the screenshot below you can see where to access the creation packs and where to click to add more slides to your game.  My game now has a title slide, an audio introduction, and an identification question. Now I’ll add one more slide and another activity type. This time rather than tapping to identify their answer choices, students will type their answers. To create that kind of question I added a new slide and an image to it. In this case (seen in the screenshot below) I added a picture of a skier. I then selected the activity type of “Talk or Type” which allowed me to trace the skier and then ask the question, “is this a summer or winter sport?” When students see this question in the game they’ll type or speak their responses. 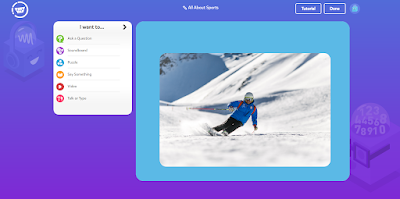 Before finishing the editing of your game you can preview it and play it as your students would. When you finish your game just click the “done” button and it is automatically saved in your TinyTap account. In your account dashboard you can choose to keep your game in draft mode (nobody but you can see it) or you can publish it and share it with your students. A complete set of game creation tutorials is available by clicking “tutorial” in the upper-right corner of the game editor screen in TinyTap. I also made this short tutorial to demonstrate everything that is outlined above.  Applications for Education TinyTap makes it easy to create engaging, educational games for your students to play at home or in your classroom. You can use the basic framework that I shared today to create identification games for topics in elementary school science and math lessons. For example, you could create a game in which students have to identify all of the mammals that appear on the screen. Another example is to create a game in which students identify shapes. Thinking back to the days when I thought that I might want to be a music teacher, creating a TinyTap game in which students practice identifying whole notes, half notes, quarter notes, and eighth notes could be a fun way for them to practice reading music. Additionally, another way to use TinyTap for music lessons is to import images of musical instruments and have students practice identifying and “playing” them. Here’s one example and here’s another. Read Aloud in Edge and Other Immersive Reader Uses Immersive Reader in Edge lets users pick the voice in which pages are read aloud, lets users chose the speed at which pages are read aloud, and it lets users adjust the size and spacing of the font that is displayed while pages are read aloud. There are some additional features that are also helpful in some situations. For example, you can have parts of speech highlighted by Edge. In this short video I provide a demonstration of using Immersive Reader in Microsoft Edge.  Here are a few more ways to use Immersive Reader. How to Highlight, Annotate, and Share Pages in Microsoft Edge  How to Have PDFs Read Aloud by Using Microsoft Edge  How to Use Immersive Reader in Microsoft Forms  What's the Difference Between Snow, Sleet, and Freezing Rain? The following videos explain the conditions that create freezing rain, sleet, and snow. Freezing Rain Explained is a video from the Weather Channel. The video includes a demonstration that science teachers could recreate with dry ice in their science labs.  The Difference Between Snow, Sleet, and Freezing Rain is a video from a news channel in my hometown. This video not only does a good job of explaining the differences, it's also a good model for using some simple green screen effects to create an explanatory video.  Speaking of green screen effects, my ebook 50 Tech Tuesday Tips includes ideas and tutorials for creating green screen videos. Get your copy right here! Old School Meets New School in Volley for Education If you're about my age or older, you probably remember the first online courses being almost entirely text-based and conducted through a message board or listserve platform. In those courses you would have a section for group discussion (with perhaps some subsections) and a section for dialogue with just the instructor. You'd write to participate in the discussions. In Volley you could set-up an online course discussion with the same structure of places for group discussion and places for individual discussions with the instructor. The benefit of using Volley is that those discussions can include video and audio dialogues in addition to the text component. There's also a handy screen recording tool that you can use to make videos in which you give private feedback about a student's essay or slideshow. That simple process is demonstrated in this video.  Applications for Education Volley could be the solution you're looking for if you're someone who always liked the structure of message boards for online courses, but wished it had video and audio messaging components. Disclosure: Volley is currently an advertiser on this blog. More Recent Articles |
Email subscriptions powered by FeedBlitz, LLC • 1800 Camden Road, Suite 107-258 • Charlotte, NC 28203, USA
This is dummy text. It is not meant to be read. Accordingly, it is difficult to figure out when to end it. But then, this is dummy text. It is not meant to be read. Period.
« Prev Post
Next Post »
ConversionConversion EmoticonEmoticon