Click here to read this mailing online.
Here are the latest updates for nurhasaan10@gmail.com "Free Technology for Teachers" - 3 new articles
Ten Cool Things You (And Your Students) Can Do With Lumio Lumio was one of my favorite new tools in 2021. I wrote about it back in November, but I don’t think I fully captured everything that makes Lumio great. And since Google Analytics tells me that people prefer articles that have lists, here are ten cool things that you and your students can do with Lumio. Take a look and then give Lumio a try for yourself. 1. Physics and Math Simulations Lumio can be used in all subject areas in elementary school, middle school, and high school. The latest update to Lumio lets you incorporate PhET simulations into the online lessons and activities that you create in Lumio. PhET, produced by the University of Colorado Boulder, offers nearly 100 simulations designed to help students understand concepts in physics, chemistry, earth science, biology, and mathematics. Speaking of mathematics, you can also use the Desmos graphing calculator directly inside of your Lumio account to create mathematics lessons and practice problems for your students. Here’s a video on how to use PhET simulations in Lumio activities.  2. Make Your Favorite Images and Slides InteractivePerhaps my favorite aspect of Lumio is that you don’t need to create all new material in order to use it. In fact, you can simply import your existing slides (Google Slides and PowerPoint), PDFs, and images into Lumio and turn them into interactive, online activities for your students. Take a look at this video to see how easy it is to import your Google Slides into Lumio.  3. Make Any Activity Collaborative or Individual! In Lumio you can make any page in any lesson a collaborative activity or an individual activity. To do that simply click on the magic wand icon while editing your activity then choose collaborative or individual. The collaborative option provides the whole class with access to one shared copy of the activity. The individual option provides each student with his or her own copy of the activity to complete. 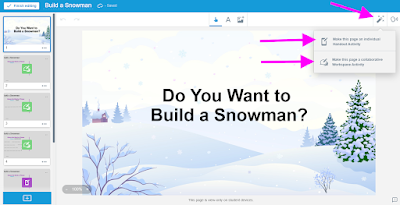 I tend to think of formative assessment in broader terms than many other teachers. For example, I think that any activity that gives me in-progress feedback about how my students understand a concept or topic is a form of formative assessment. To that end, I love Lumio’s “Shout it Out” activity template. This is an activity in which all students quickly respond to one prompt that you give them. Responses are shown on your screen and you can display them in a couple of ways including as a randomized display of digital sticky notes. You can also choose to display or not display students’ names alongside their responses. Now if your definition of formative assessment is a bit more structured than mine, Lumio has formative assessment templates for you. In my first blog post about Lumio I went into detail about creating formative assessments because I think that creating a formative assessment provides the best way to learn how Lumio works from a teacher’s perspective. Here’s the video overview from that blog post. 5. Share Successful Lessons With Your Colleagues Have you ever had a lesson that went absolutely perfectly from start to finish? You know, one where you felt like the kids “got it” and had fun “getting it.” I've had a few of those in my career and I shared them widely with my colleagues. If you have one of those lessons and you’ve done it through Lumio, you can quickly share it with your colleagues. To do that, just hit the “share” button on your lesson and send the link to your colleagues. Don’t forget to tell them why you’re sharing it and how much your kids liked it. Check out this Lumio Tweet to see a video demo of how to share a lesson with your colleagues. 6. Play YouTube Videos Without Distractions I love a good YouTube video to help me help my students understand a concept. For example, I used some of these PowerCert videos in my networking course last year. What I don’t love is dealing with the advertisements and “related” videos that come with using YouTube in my classes. Lumio offers a solution to that problem. When you use YouTube videos in Lumio, you don’t see the advertisements and related video suggestions typically found when visiting YouTube. 7. View Activities the Same Way Your Students See Them Lumio does something that I wish every educational technology tool would do. That is to show teachers exactly what their students will see when using the tool. From interactive previews to seeing student work live in delivery, teachers get a full picture of the lesson their students will be engaged in. 8. Add Audio Support to Your Activities Whether it is to add clarification, to give helpful hints, or to simply read directions aloud, Lumio has you covered. On any and all of your activities/pages you can record audio support for your students to play aloud. To do that simply click on the audio icon while editing an activity. 9. Keep Students Signed-in When Switching Activities Nothing kills momentum quite like having to wait while all of your students enter a code to join an online activity. Fortunately, that’s not an issue when using Lumio. Your students use one code to join your class and as long as they keep using the same computer, tablet, or phone they stay signed in even when you switch activities. In other words you could do a Lumio activity in the morning then do another in the afternoon and your students wouldn’t have to re-enter the classroom code. On a related note, you would think that by 2022 every educational technology tool would work on all mobile devices and all computers, but that’s not always the case. Lumio works on every device commonly used by students. Students can complete Lumio lessons on iPads, Android tablets, iOS and Android phones, and in the web browser on their favorite laptop computer (including Chromebooks). 10. Get Inspired! If you’ve ever been “stuck” and need some inspiration for creating a new lesson, Lumio has you covered with a huge selection of lesson activity templates and resources covering everything from elementary school math to high school language arts. When you find a template that you like you can copy it into your Lumio library where you can then use it as written or modify it to better suit your needs. Here’s a little demonstration of how that’s done.  Create an Educational Puzzle Game With TinyTap Over the last two weeks I covered the basics of creating an educational game with TinyTap and how to make it look good. This week I’m going to start diving into some of the more interesting game types and formats available in TinyTap. The first of those is the puzzle game format. Ideas and Examples for Puzzle Games When you read “puzzle game” you might automatically think about jigsaw puzzles, I know that I do. You can certainly make a jigsaw puzzle game with TinyTap, but there are a lot of other ways to use the puzzle game creation tools in TinyTap. With the TinyTap puzzle game creation tools you can create games in which students drag and drop game pieces together. By doing this you can create games in which students match letters to pictures as is done in this game or games in which students place animals onto the countries, states, or provinces that they represent as will be done in the game that I create. Another way to think about using the TinyTap puzzle game creator is to have students complete a counting activity. In this style of game students will drag a sequence of objects into position in order to count them. Give it a try in this counting trains game. There is probably an infinite number of identification games that you could create with TinyTap’s puzzle game tools. A few that I can think of are games to identify birds and other wildlife, games to practice identifying parts of speech, and games to practice identifying parts of a computer system. And for some reason that I can’t identify when I thought of making a puzzle game for practicing identifying things, I thought of how helpful it would have been to have an identification game when I was taking an anatomy and physiology course twenty something years ago. And because each game is created on a slide-by-slide basis, it is possible to combine elements of counting, sorting, matching, and object alignment into one comprehensive game. Take a look at this game about fruits and vegetables as an example of using all of the puzzle tools in one game. How to Make a Puzzle Game in TinyTap For this example, I’m going to create a game in which I have students drag and drop flags onto the New England states that they represent. To begin, just like creating any other game in TinyTap I’ll start by adding a title slide for my game. As a reminder, you can use any of the styles, layouts, and creation packs to design the slides in game. This video that I published last week shows you how to use those design tools. The next step of the puzzle game design process is probably the most important one to get right at the start. Put all of the pieces together in the places where they should be when the puzzle is solved. In other words, think of it like making a jigsaw puzzle by cutting up a picture. Another way to think about it is creating the answer key before writing the quiz. In this case I’ll be putting a map of New England on my slide and then placing the corresponding state animals on that map. See my screenshot below for more details. 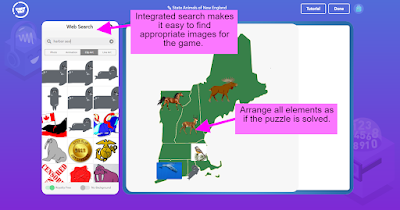 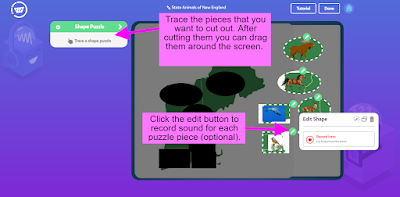
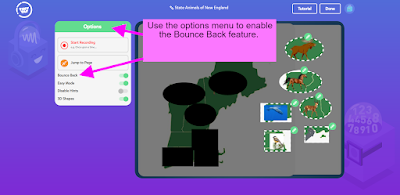 It is also possible to create a puzzle game that doesn’t use a bank of answer choices. TinyTap calls this alternative puzzle type a “mixed puzzle.” Mixed puzzles are great for creating games in which students match two or more pieces together to create a complete image. For example, in my game I created a mixed puzzle in which students have to reassemble the map of New England states. To that I duplicated the slide from earlier and then removed my cut out pieces. Then I used the tracing tool to trace each state and made them their own pieces of the puzzle. When you create a mixed puzzle game, as I did with the map of New England, it could be very helpful to your students to have “easy mode” enabled so that they can see the full picture before having to try to piece it together. That’s a lot when you put together a physical jigsaw puzzle and look at the picture on the box to help get yourself started. 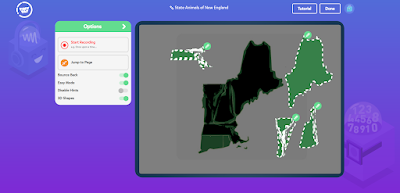 The folks at TinyTap were kind enough to put together a collection of puzzle games that anyone can try right now. So if you’re looking for ideas for making educational games for your students, take a look at following examples:
 Making Snowflakes and Sundials In this SciShow Kids video students learn how a sundial works and how they can make their own sundials. The video could be the basis for a fun, hands-on lesson about learning to tell time.  For those in cold, northern climates creating and taking sundials outside might not be practical right now. SciShow Kids has a video that is a little more appropriate for winter. That video is How to Make a Paper Snowflake. The video gives directions at a nice pace that students can follow. The video also introduces some science vocabulary that might be new to elementary school students.  More Recent Articles |
Email subscriptions powered by FeedBlitz, LLC • 1800 Camden Road, Suite 107-258 • Charlotte, NC 28203, USA
This is dummy text. It is not meant to be read. Accordingly, it is difficult to figure out when to end it. But then, this is dummy text. It is not meant to be read. Period.
Next
« Prev Post
« Prev Post
Previous
Next Post »
Next Post »
ConversionConversion EmoticonEmoticon